What You Need to Know to Build Your Own In-Ear Rig
So you play in a band and you have been keeping up with our blogs. After reading our What You Need to Know about In-Ear Monitors blog, you are ready to take the plunge. But this plunge can be an expensive and a very confusing one to take. Have no fear! We are here to walk you through what you need to know about building your own in-ear rig and exactly what gear you are going to need. Before we jump in, it is important to know that there are two main types of in-ear systems; closed systems and open systems. A closed system is one in which the signal going to your ears is untouched by the front of house, meaning that it has its’ own mixer. An open system is one where your in-ear mix is created at front of house, the way many floor monitor mixes are made at smaller venues. Today, we will be focusing on a closed system.
What you’ll need
As un-fun as this purchase can be, the first piece of gear you are going to need to build out an in-ear system is a quality power conditioner. As tempting as it can be to save a couple hundred dollars and use a power strip for your system, clean power is the last piece you want to skimp on when building out a rack. Your conditioner is important for a few reasons, the first of which being that it provides CLEAN power. When out on the road, you will be plugging this rig into a different outlet every single night. It is likely that you will run into more than a few venues with bad power. Bad power can mean unwanted noise in the system and even system shorts (believe me, you don’t want to fry a $10k in-ear system). In addition to clean power, a quality power conditioner keeps the inside of your rack clean and accessible. It will keep all of the power plugs for your transmitters, your mixer, and other powered pieces of gear organized and all in one place.
The next piece of gear you will need is your wireless transmitters and receivers. Quality systems are typically going to start in the $600. There are more affordable options available, but we recommend steering clear from them as these are what’s pushing sound into your ears. These systems will affect the quality of the sound going into your ears more than anything else. Again, while it may seem nice to save the money, tinny sounding packs that are cutting in and out every few minutes will get old fast while out on the road. When purchasing these wireless systems, make sure you are purchasing systems with ranges appropriate for the stages that you are playing. One of the biggest differences between systems is the range that they have available. If you are playing small clubs and bars, a system like the Shure PSM300 will suit your needs just fine, but if you are playing larger theaters or festival shows, you may want to invest in a more robust system with a more extensive range.
In order to get signal into the system you are going to need an xlr splitter. All this does is take a single XLR feed and split it into two mono signals. Having a splitter allows your system to stay closed by taking one feed and sending it to FOH while sending the other to your own mixer. The ART S8 is an excellent and affordable option for an XLR splitter.
Next, is what we consider to be the single most important part of an in-ear rig, your mixer! It is crucial you select the right one as this is more or less the brain of the entire operation. While analog mixers will get the job done, digital mixers are going to keep things more streamlined, contained, and most importantly CONSISTENT. At the moment, the majority of bands running in ear systems are using a Behringer X32 rack, and for good reason. The X32 rack offers all the functionality of a classic X32 within a 3U rack mountable unit. There are really two main advantages to the X32 rack. The first, and most important, is that the X32 rack can be controlled entirely through an iPhone or Android app. This is incredible, because it allows each member of the band to set their own in-ear mix each night on their phone, instead of relying on the venues engineer or paying a monitor engineer to create mixes for the band out on the road. (Note, I am not discrediting the work of monitor engineers, merely stating that many young bands can not afford their own monitor engineers.) The second great feature of the x32 Rack has the ability to tie into any other Behringer X series product. So when your band and tour crew grows, the x32 rack will integrate into the system instead of being pushed to the wayside.
Now that you have all the rack gear you need, you’re going to need something to put it in! Before you go off and purchase a rack for your rig, you are going to need to figure out how many units you are going to need. For most in-ear systems, you will need a minimum of 8. In addition to the size, you will need to select a rack that suits your travel needs. For many bands, this means purchasing a rack that is shock absorbent. This typically means there is a layer of foam between the rack that the gear is sitting in and the actual shell of the rack. If you are going to traveling with said rig, you really won’t want to get anything other than a shock proof case. This just ensures that the rack units aren’t taking the direct blow of the impact of the case being picked up, put down, moved around, and tipped over while out on the road. Lastly, try and select a case that is stable. The wider and more stable you can get it, the smaller the risk of the rig toppling over and bumping your gear around (this happens surprisingly often).
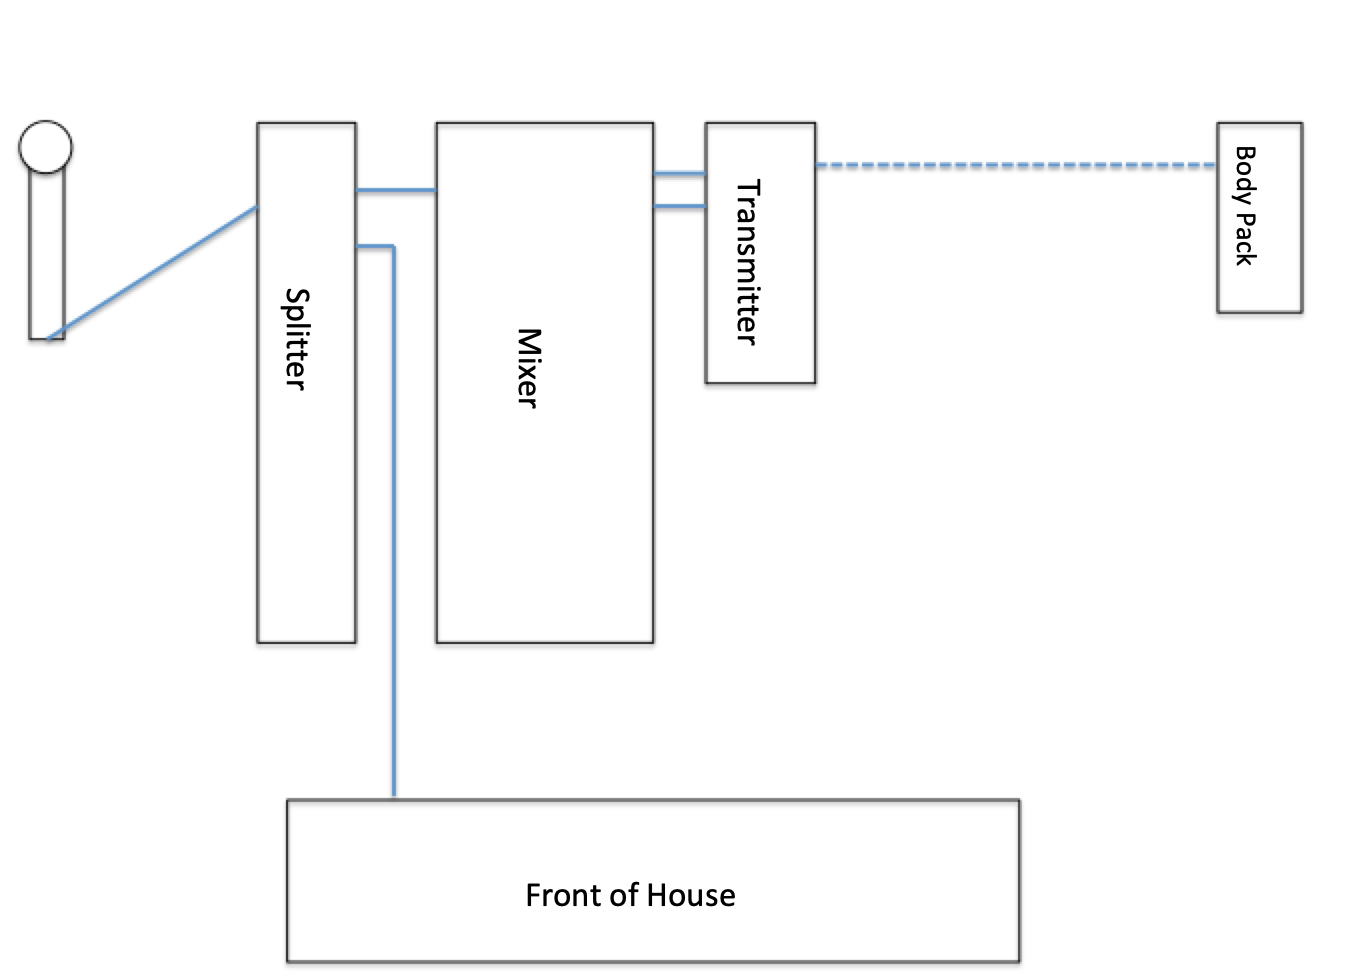
Pictured below is the recommended signal flow for a wireless in-ear monitoring rig. We have only one signal depicted below, but you would repeat as necessary for however many inputs you would need and for how every many transmitters/body packs you would be using. The signal will go from the stage mic straight into the front of the splitter on the rack. The signal will then be split into two. One feed will go to front of house to be mixed and sent through the mains while the other will go to the in-ear rig’s mixer to be mixed for the band’s ears. From the mixer, a stereo signal will be sent to the wireless transmitter. From there it is sent wirelessly to the receiver/bodypack and up through the in-ears.

Wiring it all up
Follow the diagram above for signal flow and repeat as needed for inputs/outputs. When wiring up the rig. It is going to save you hours of stress and headaches down the road if you use proper cable management. Try your best not to just throw all the cables in the back of the case without any rhyme or reason. Keeping a clean back of your rack is going to keep everything visible, accessible, and easy to follow if you ever need to track down a bad cable or swap something out. Additionally, don’t be afraid to reach out to your friendly neighborhood rig building pros (like Runway Audio) about any questions you may have. Or, if this all seems like too much to execute on your own, we are happy to work something out and wire yours up for you!
RENTAL OPTION
If you are in the greater Nashville Area and are looking to just rent a full in ear rig like the one above. Instead of forking out the cash up front check out our friends at Nashvilleinearsrentals.com for some crazy affordable rental deals!